

Helping beginners build websites since 2017
400K+
Readers Helped
Updated for 2026
Latest Method
100%
Beginner Friendly
Disclosure: ElegantEspace is supported by readers like you. We may earn an affiliate commission when you purchase through our links. Commissions do not affect our editors’ opinions or evaluations.
XML Sitemap Introduction
An XML sitemap helps search engines like Google discover the important pages, posts, and other content on your website.
It provides a structured list of URLs that search engine crawlers can use to understand your website’s content.
If you’re using WordPress, creating an XML sitemap is simple. You can generate one automatically using an SEO plugin like Yoast SEO.
In this guide, we’ll show you how to create an XML sitemap in WordPress and submit it to Google Search Console.
What Is an XML Sitemap?
An XML sitemap is a file that lists the important URLs on your website. It helps search engines discover your content and understand how your website is organized.
For example, your XML sitemap may include:
- Homepage
- Important pages
- Blog posts
- Categories and other relevant content
A typical WordPress XML sitemap URL looks like this:
https://example.com/sitemap_index.xml
How to Create an XML Sitemap in WordPress
The easiest way to create an XML sitemap in WordPress is by using an SEO plugin. We’ll use Yoast SEO for this tutorial.
Follow these steps:
Install and Activate Yoast SEO
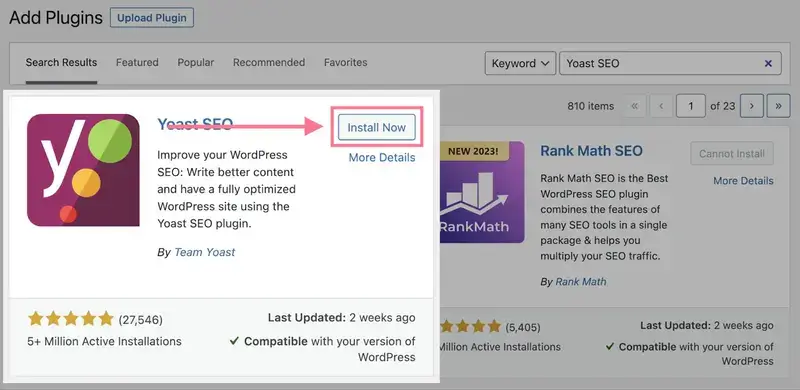
- Log in to your WordPress dashboard.
- Go to Plugins → Add New Plugin.
- Search for Yoast SEO.
- Click Install Now and then Activate.
Once activated, Yoast SEO will automatically generate an XML sitemap for your website.
Enable XML Sitemaps

- Go to Yoast SEO → Settings in your WordPress dashboard.
- Find the Site features section.
- Locate the XML sitemaps feature.
- Make sure it is enabled.
- Save changes
View Your XML Sitemap

After enabling XML sitemaps, open your browser and visit:
https://yourdomain.com/sitemap_index.xml
Replace yourdomain.com with your actual website domain.
You should see an XML sitemap index containing links to different sitemaps, such as:
- Post sitemap
- Page sitemap
- Category sitemap
Click any sitemap link to view the URLs included in it.
That’s it! Your WordPress XML sitemap is now ready.
How to Submit Your XML Sitemap to Google Search Console
Creating a sitemap is only the first step. You should also submit it to Google Search Console to help Google discover your website’s URLs.
Follow these steps:
Open Google Search Console
- Visit Google Search Console and select your website property.
- Open the Sitemaps Section
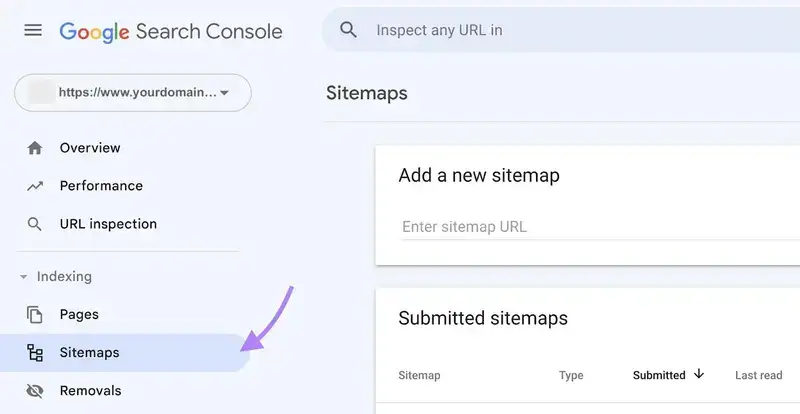
Add Your Sitemap URL
From the left-hand menu, click Sitemaps under the Indexing section.

- Find the Add a new sitemap field.
- Enter "sitemap_index.xml."
- Click Submit.
Check Sitemap Status
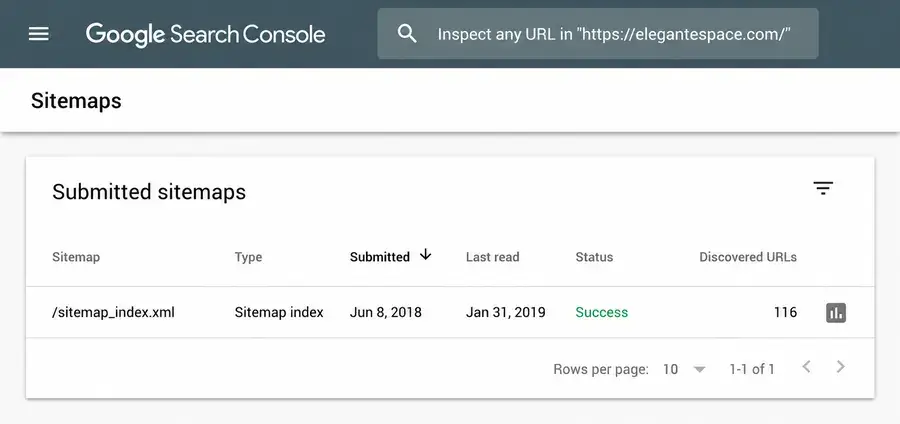
After submission, Google will process your sitemap.
You can return to the Sitemaps section to check its status and see whether Google successfully fetched the file.
Keep in mind that submitting a sitemap does not guarantee that Google will index every URL. Google still evaluates each page before deciding whether to index it.
Continue Your SEO Journey
Build your skills one step at a time with these essential SEO guides.
Keyword Research
Start here
Discover what your audience searches for and find relevant topics worth targeting.
On-Page SEO
Optimize your pages
Improve titles, headings, content, images, and internal links to help search engines understand your pages.


it is a good explanation of XML and it’s help lot.
-prashant
Thank you 🙂
Woah your blog is amazing i love understanding your site content. Continue the truly great artwork! You realize, plenty of person’s feel the need around due to this details, you are able to guide all of them considerably.
Thanks for your kind words. 🙂
I spent a lot of time to locate something like this
This is actually helpful, thanks.
Thanks for the excellent post