How to Make a Website in 2026 (Step-by-Step Beginner Guide)
Create a professional website in under 60 minutes — no coding needed.
- Last Update: July 13, 2026
- Introduction
- 5 Steps To Make A Website
- Step 1: Define Purpose & Goals
- Step 2: Choose A Domain Name
- Step 3: Get Hosting
- Step 4: WordPress Installation
- Step 5: WordPress Important Setup
- Step 6: Theme Installation & Setup
- Step 7: Website Page Creation
- Step 8: Blog Setup
- Checklist & Launch
- Faqs on WordPress Website
Introduction
Most people overcomplicate building a website.
But in reality — you can create a website in less than an hour using tools like WordPress.
In this guide, I’ll show you the exact step-by-step process I personally use to build fast, professional websites.
Discloser: ElegantEspace is supported by readers like yourself. We may earn an affiliate commission when you purchase through our links . Commissions do not affect our editors’ opinions or evaluations.
How to Make a Website (Quick Steps)
- Choose Your Website Type
- Choose a Domain Name
- Buy Web Hosting
- Install WordPress
- Choose a Theme
- Install Plugins
- Add Pages & Content
- Launch Your Website
Step #1
Choose Your Website Type
Before you start building your website, you need one simple thing: clarity.
Not technical skills. Not tools. Just clarity.
Because the type of website you choose will decide:
- How your site looks
- What features do you need
- And how you’ll make money from it
Think of it like choosing a blueprint before building a house 🏠
You Can Create Different Types Of Websites:
1. Blog Website
A blog is perfect if you want to share knowledge, ideas, or experiences.
You can write about:
- Technology
- Health & fitness
- Travel
- Personal experiences
- Tutorials
Over time, you can make money through:
- Affiliate marketing
- Ads
- Selling courses or e-Books
2. Business Website
A business website is designed to showcase your services, business, or portfolio.
You can use it to:
- Promote your services
- Show your work (portfolio)
- Collect leads or client inquiries
This is ideal if you run an agency or want clients online.
3. eCommerce Website
An eCommerce website allows you to sell products online.
You can sell:
- Physical products
- Digital products (courses, templates, eBooks)
- Services
You can build this using WordPress + WooCommerce.
Which One Should You Choose?
If you’re confused, here’s a simple shortcut:
- Want to earn from content → Start a blog
- Want clients → Build a business website
- Want to sell products → Go for eCommerce
Pro Tip (Important)
Don’t try to make everything perfect from day one.
Start simple.
You can always:
- Add a blog later
- Convert into an eCommerce store
- Expand your website as you grow
👉 Most successful websites started small and evolved over time.
Step #2
Choose a Domain Name
Your domain name is your website’s address on the internet.
It’s what people type in their browser to find you.
👉 Just like google.com or youtube.com
Think of it as your digital identity — your brand’s first impression.
What Makes a Good Domain Name?
A great domain name is:
- Short and simple → Easy to type and remember
- Easy to pronounce → People should say it without confusion
- Brandable → Unique and professional
- Relevant → Matches your niche or purpose
Example: elegantespace.com — clean, memorable, and brandable.
Tips To Choose The Perfect Domain
Follow these proven tips:
- Keep it under 15 characters
- Avoid numbers and hyphens (like my-site123.com ❌)
- Use simple words
- Choose a name you can grow with
- Check spelling carefully
Which Extension Should You Choose?
The extension is the last part of your domain.
Best options:
- .com → Most popular And Trusted
- .in → Good for India-based audience
- .net / .org → Alternative options
How To Check Domain Availability
Before finalizing, you need to check if your domain is available.
You can do this while buying hosting (recommended), where:
- You get a free domain for 1 year
- Everything is set up in one place
👉 This saves time and avoids technical confusion.
Use this free tool to check if your desired domain name is available:
Pro Tip (Important)
Don’t spend hours trying to find the “perfect” name.
A good name today is better than a perfect name tomorrow.
👉 Your brand becomes strong because of your work — not just the name.
Once you’ve chosen your domain name, it’s time to make your website live.
👉 Let’s move to the most important step — buying hosting 🚀
Step #3
Buy Web Hosting (Make Your Website Live)
Now that you have your domain name, the next step is to make your website visible on the internet.
For that, you need web hosting.
👉 Think of it like this:
- Domain = your website’s address
- Hosting = the land where your website lives
Without hosting, your website simply doesn’t exist online.
What is Web Hosting?
Web hosting is a service that stores all your website files and makes them accessible to visitors 24/7.
Whenever someone types your domain name, hosting ensures your website loads instantly.
Which Hosting Should You Choose?
If you’re a beginner, choosing the right hosting is very important.
- Affordable pricing (perfect for beginners)
- Free domain for 1 year
- Fast loading speed
- Beginner-friendly dashboard
- 1-click WordPress installation
One of the most reliable web hosting and domain name providers I’ve found—and the one I currently use—is Hostinger (our partner). They also include a free domain name for one year.
Their service is quite affordable compared to others, and they are well-known for their excellent customer support via email and chat, which is available 24/7.
Having said that, in this guide, I’ll use Hostinger to build a website (simple, easy, and very cost-effective).
So, without further ado, let’s get started…!!
Step: 3.1
Choose Your Web Hosting Plan
You can get your domain name and web hosting together from Hostinger, which makes the setup much easier for beginners.
I’ve recommended Hostinger in this guide because it offers a simple setup, fast performance, and very affordable pricing — perfect if you’re just starting your first website.
👉 To begin, visit Hostinger and choose a hosting plan.
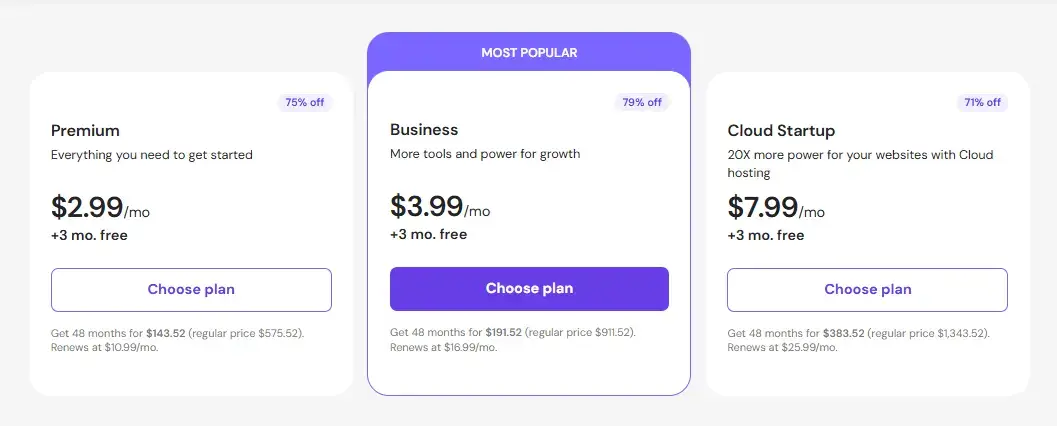
Hostinger provides multiple plans, but for this tutorial, I recommend the Premium plan.
Note: If needed, you can always upgrade or downgrade your plan.
Why Choose the Premium Plan?
The Premium plan is ideal for beginners because it includes:
- Free domain for 1 year
- Ability to host multiple websites
- Better performance than basic plans
- Easy WordPress installation
👉 It gives you everything you need to build and grow your website without limitations.
Which Duration Should You Select?
Hostinger offers different pricing options depending on how long you sign up for.
👉 The 48-month plan gives you the lowest price per month, making it the best value overall.
Best Value
🏆 Best Value Option (Recommended)
If you’re serious about building a website and want to save the most money long-term:
👉 Go with the 48-month plan
- Lowest monthly price
- Maximum savings
- No need to renew every year
- Perfect for long-term projects
Most Popular
🔥 Most Popular Choice (Beginner Friendly)
If you’re just starting and prefer a smaller upfront investment:
👉 The 12-month plan is a safe and flexible option
- Lower initial cost
- Enough time to learn and grow
- Can upgrade later anytime
- Easy WordPress installation
- If you’re comfortable investing upfront and planning to run your website long-term: Consider the longer plans (24 or 48 months)
- If you’re starting out or prefer a lower upfront cost: Go with the 12-month plan
For this step-by-step guide, we’ll go with the 12-month plan to keep things simple and beginner-friendly.
Step: 3.2
Review Your Order & Enter Your Domain Name
After selecting your hosting plan, you’ll now see your order summary page.
This is where you can:
- Review your selected plan
- Confirm pricing and discounts
- Choose your domain name
Choose Your Domain Name
On the left side, below the duration section, you’ll also see a field to enter your domain name.
👉 Simply type your desired domain (e.g., yourwebsite.com) and check availability.
If it’s available, you can select it instantly (Your domain is free for 1 year with this plan.)
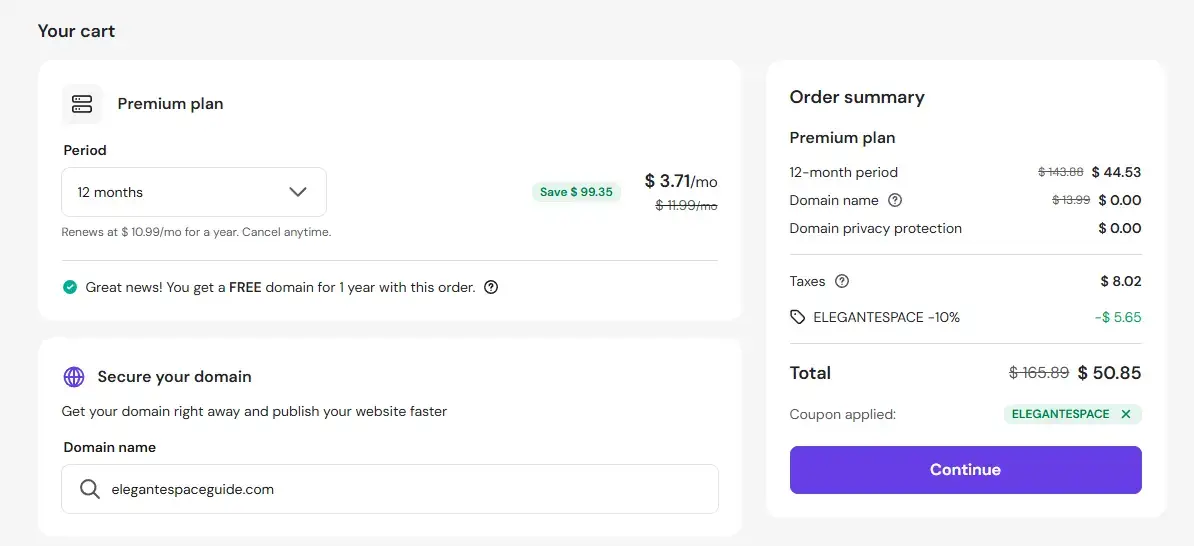
Check Your Final Price
On the right side, you’ll see the order summary, including:
- Hosting cost
- Free domain (₹0.00 / $0.00)
- Taxes (if applicable)
- Discount applied
Use coupon code ELEGANTESPACE to get Special 10% off only for you!
After clicking on the “Continue” button, you’ll be asked to create a Hostinger account.
To create an account, simply:
- Enter your email address
- Create a password
- Or sign up using Google
👉 Your account will be created instantly, and you’ll move to the secure payment step to activate your website.
Choose Your Payment Method
Hostinger supports multiple secure payment options, such as:
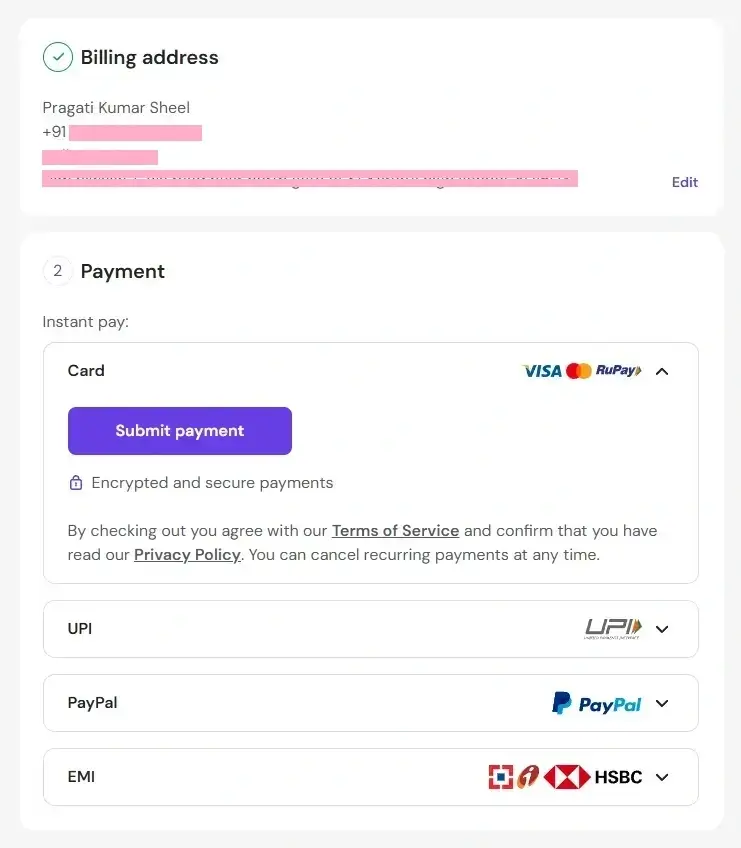
- Credit / Debit Card
- UPI / Net Banking (India)
- PayPal (in some regions)
- EMI
Select your preferred payment method and complete the process. Once your payment is successful:
- Your hosting account gets activated instantly
- Your domain is registered
- You get access to your dashboard (hPanel)
Step #4
Access Your Dashboard & Set Up Your Website
After completing the payment, you’ll be redirected to your Hostinger dashboard (hPanel).
👉 This is your website control center — where everything begins.
What You’ll See First
When you log in, Hostinger may guide you with a setup wizard.
You might see options like:
- Create a new website
- Migrate an existing website
- Skip setup
👉 We will choose the option: create a new website.
Step: 4.1
Create Your Website
On the Hostinger panel, you can see an option of adding new website. Follow the steps below to launch your website.
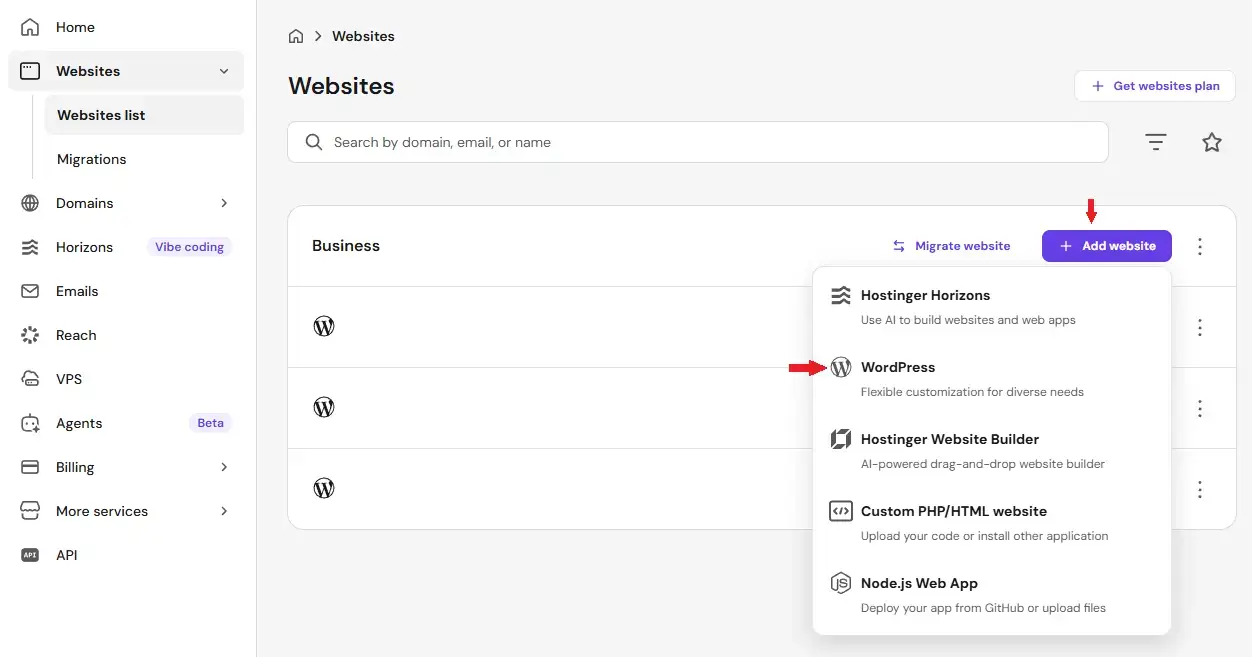
- Click on “Add Website”
- Choose WordPress as your platform
- Click Continue
Step: 4.2
Choose Website Type (Optional)
Hostinger may ask:
👉 “What type of website are you creating?”
- You can select:
- Blog
- Business
- Online store
- Myself or my business
- Someone else
This just helps them suggest designs — choose any or skip.
Once you continue:
👉 Hostinger will automatically install WordPress for you.
This takes around 1–2 minutes.
After installation, you’ll see:
👉 “Website Created Successfully.”
Now you can access your website dashboard.
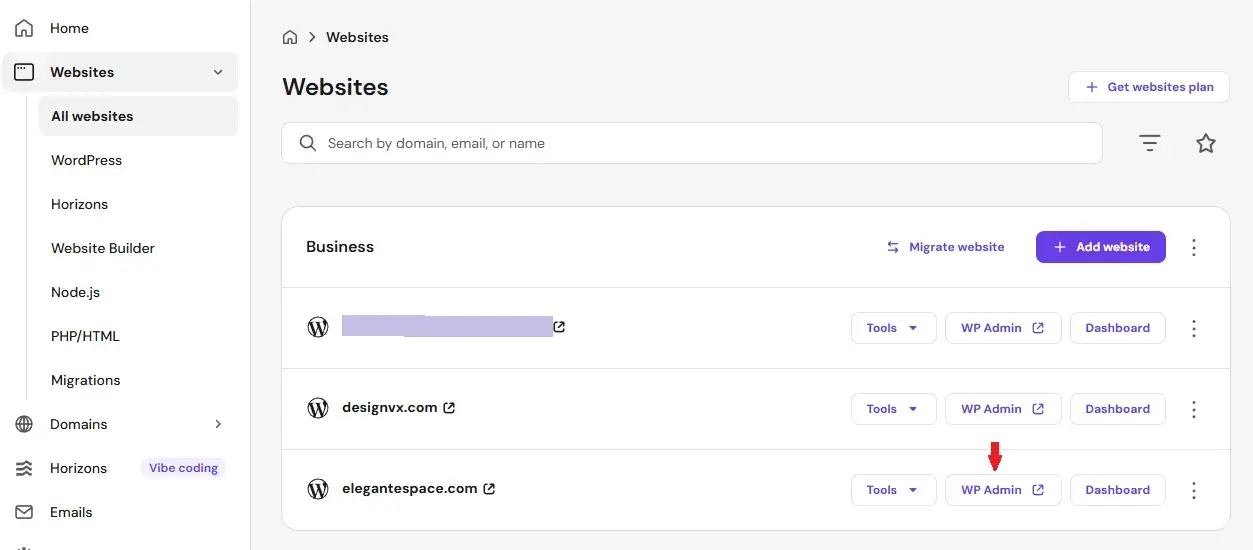
Step: 4.3
How To Access Your Website
Click on:
👉 “All website” → “Choose Your Domain Name” → “Click on WP Admin”
OR visit:
👉 yourdomain.com/wp-admin
Login using your WordPress username and password.
🎉 Congratulations
You now have a live website on the internet 🌍
Step #5
WordPress Basic Setup
Now that WordPress is installed, there are a few basic settings you should configure before designing your website.
👉 This will make your website cleaner, faster, and SEO-friendly.
Step: 5.1
Change Website Title & Tagline

1. Go to Settings → General
2. Enter:
Site Title (your website name)
Tagline (short description)
3. Click Save Changes
👉 This appears in search results and browser tabs.
Step: 5.2
Set SEO-Friendly Permalinks (VERY IMPORTANT)
- Go to Settings → Permalinks
- Select “Post Name”
- Click Save Changes
👉 Your URLs will look clean like:
yourwebsite.com/sample-post
Instead of messy URLs.
Step: 5.3
Delete Default Content
WordPress comes with some dummy content.
👉 Remove these:
- Default Post (“Hello World”)
- Sample Page
- Unused Plugins
✔ Go to Posts / Pages → Delete
👉 Keeps your website clean.
Step: 5.4
Disable Comments (Optional)
If you don’t want comments:
- Go to Settings → Discussion
- Uncheck “Allow people to submit comments”
- Save changes
👉 Useful for business websites.
Step: 5.5
Set Homepage

- Go to Settings → Reading
- Select A static page
- Choose your Home page
- Click Save Changes
👉 This makes your homepage fixed instead of showing blog posts.
Step: 5.6
Remove Unused Themes
- Go to Appearance → Themes
- Delete unused themes
👉 Keep only 1–2 themes
✔ Improves security & performance.
Step: 5.7
Install Essential Plugins (Add Features to Your Website)
At this stage, your website looks good — but it still needs functionality like SEO, speed, and advanced design.
👉 This is where plugins come in.
Think of plugins as apps for your website 📱
What Is A Plugin?
A plugin adds new features to your website without coding.
With plugins, you can:
- Improve SEO
- Increase speed
- Add contact forms
- Design better pages
Must-Have Plugins (Keep It Simple)
Don’t install too many plugins. Start with these essentials:
Step: 5.7.1
1. Elementor (Page Builder)
👉 Must have plugin for every website, make sure it’s installed and activated.
✔ Drag-and-drop design
✔ No coding required
✔ Create professional layouts
Step: 5.7.2
2. Yoast SEO / Rank Math (SEO Plugin)
This helps your website rank on Google.
✔ Optimize posts for keywords
✔ Add meta titles & descriptions
✔ Improve SEO score
👉 Very important for traffic.
Step: 5.7.3
3. LiteSpeed Cache / WP Rocket (Speed Optimization)
Speed is critical for user experience and SEO.
✔ Faster loading website
✔ Better performance
✔ Improved Google ranking
How To Install Plugins (Step-by-Step)
- 1. Go to your WordPress dashboard
- 2. Click on Plugins → Add New
- 3. Search plugin name (e.g., Yoast SEO)
- 4. Click Install → Activate
- 👉 Repeat for each plugin.
Now your WordPress setup is complete.
👉 Let’s design your website using a theme and make it look professional 🎨
Step #6
Design Your Website (Choose a Theme)
Now your website is live… but it probably looks very basic.
👉 Don’t worry — this is completely normal.
Right now, your website is like an empty house.
In this step, we’ll give it a beautiful design and structure.
Step: 6.1
Choose Your Website Theme (Design)
A theme is a ready-made design template that controls how your website looks.
It defines:
- Layout
- Colors
- Fonts
- Overall appearance
👉 With the right theme, your website will look professional in minutes.
Recommended Themes (Beginner-Friendly)
To keep things simple and fast, I recommend using:
✔ Astra → Lightweight, fast, and highly customizable
✔ Hello → Clean, simple, and Elementor – Supported
👉 Both are top-rated plugins and perfect for beginners.
Step: 6.2
How To Install a Theme (Step-by-Step)
- Follow these steps:
- 1. Login To Your WordPress Dashboard 👉 yourdomain.com/wp-admin
- 2. Go To Appearance → Themes
- 3. Click On “Add New”

- 4. Search for “Astra / Hello”
- 5. Click Install → Activate

What Happens After Activation?
Once your theme is activated:
✔ Your website gets a clean design
✔ Layout becomes structured
✔ You’re ready to customize pages
👉 Now your website starts looking like a real brand.
👉 In the next step, we’ll create important pages and start building your website layout
Step #7
Create Important Pages (Build Your Website Structure)
Now that your design is ready, it’s time to create the core pages of your website.
👉 These pages help visitors understand who you are, what you offer, and how to contact you.
Think of this as building the rooms inside your house 🏠
Step: 7.1
Essential Pages You Should Create
Start with these basic pages:
1. Home Page
This is the main page of your website.
👉 It should:
- Explain what your website is about
- Highlight your services or content
- Guide users to other pages
2. About Page
This page tells your story.
👉 Include:
- Who you are
- What you do
- Why people should trust you
3. Contact Page
Make it easy for people to reach you.
👉 You can add:
- Contact form
- Email address
- Social links
4. Services Page (Very Important)
If you offer any service, this page is a must.
👉 Use this page to:
- List all your services
- Explain what you offer
- Show pricing or packages (optional)
- Add a call-to-action (Contact / Hire Me)
5. Gallery / Portfolio Page
This page showcases your work.
👉 You can display:
- Previous projects
- Client portfolio
- Upcoming work etc
💡 If you’re a beginner:
👉 You can still create sample/demo work to build trust.
6. Testimonials Page (Trust Builder)
This is where you show what others say about you.
👉 Add:
- Client reviews
- Feedback
- Success stories
💡 If you’re just starting:
- Use initial feedback from friends/clients
- Add real results or experiences
👉 Social proof builds instant trust.
7. Blog Page (Optional But Recommended)
If you plan to create content (like guides):
👉 This is where your articles will appear.
👉 If you plan to add a blog to your website, we’ll cover it in detail in Step 8 below.
Step: 7.2
How To Create A Page (Step-by-Step)
- 1. Go to your WordPress dashboard
- 2. Click on Pages → Add New
- 3. Enter your page title (e.g., Home, About)
- 4. Click Publish
- 👉 Repeat this for all pages.

1. Title Area: Write the title of your page. Make sure you are adding the primary keyword in the title.
2. Content Area: Here you can write the content of your page. You can also insert images and videos into your content. Just click on the “Add Media Button” to insert them.
3. Additional tools: In this section, you will find many options. Here you can add featured images, adjust the page layout, and publish or preview the page.
If you want to add new page elements – click on the “+” icon that’s in the top left corner of the editor interface.

Any block you select will be added at the bottom of your page.
You can edit it freely, and change the properties of the text, plus there are colour settings in the right sidebar. Do whatever you want.
As always, remember to click on “Publish” when you’re done.
However, if you want to make your website more attractive with animation and eye-catching designs, you can install the Elementor page builder.

Designing Your Pages With Elementor (Recommended)
While WordPress comes with a default editor, for this tutorial, we’ll use Elementor to design our pages.
👉 It’s much easier, faster, and beginner-friendly.
Why Use Elementor Instead Of Default Editor?
Elementor gives you full control over your design without any coding.
With Elementor, you can:
✔ Drag and drop elements easily
✔ Create professional layouts in minutes
✔ See changes in real-time
✔ Design like a pro without technical skills
👉 This is why most beginners and professionals prefer Elementor.
How To Use Elementor
- Go to any page (e.g., Home)
- Click on “Edit with Elementor”
- Start designing using drag-and-drop
👉 You’ll see your design live as you build it.
⚡ Pro Tip
Even if you’re a complete beginner, Elementor makes designing 10x easier.
👉 You don’t need any coding or technical skills.
Step: 7.3
Organize Website Structure and Navigation
Now that you’ve created your pages, it’s time to connect everything together properly.
👉 This step ensures visitors can easily find what they’re looking for.
Think of it like creating roads between rooms in your house 🏠
Why Navigation is Important
A well-structured website helps:
✔ Visitors explore easily
✔ Improve user experience
✔ Reduce bounce rate
✔ Boost SEO rankings
👉 If users get lost, they leave. Simple.
Create a Navigation Menu
Now let’s add these pages to your website menu.
- Go to Dashboard → Appearance → Menus
- Click Create New Menu
- Name it (e.g., Main Menu)
- Select pages (Home, About, Contact, etc.)
- Click Add to Menu
- Click Save Menu

Set Menu Location
After creating the menu:
👉 Assign it to:
Primary Menu / Header Menu
This will display it at the top of your website.
Step #8
Add A Blog To Your Website
Now that your website structure is ready, it’s time to add one of the most powerful features — a blog.
👉 A blog allows you to publish content, share knowledge, and attract visitors from Google.
Why Add A Blog?
A blog is important because it helps you:
✔ Get free traffic from search engines
✔ Share useful content and guides
✔ Build authority in your niche
✔ Earn money through affiliate links
👉 This is exactly how websites like yours grow over time.
How To Add A Blog Page
- Go to Pages → Add New
- Name it “Blog”
- Click Publish
Set Blog Page In Settings
- Go to Settings → Reading
- Find “Posts Page”
- Select your Blog Page
- Click Save Changes

How To Create A Blog Post
- 1. Go to Posts → Add New
- 2. Enter your post title
- 3. Add your content
- 4. Click Publish
- 👉 That’s it — your first blog post is live.
💡 Important !
Want a Step-by-Step Guide?
Setting up a blog properly requires a few important steps, like choosing the right structure, writing your first post, and optimizing for SEO.
In this complete guide, you’ll learn:
- How to choose the right blog niche
- How to set up your blog properly in WordPress
- How to write your first blog post
- How to optimize your posts for SEO
- How to drive traffic from Google
- How to monetize your blog (affiliate, ads, etc.)
Final Checklist & Launch Your Website
Your website is almost ready… now let’s make sure everything is set before going live.
👉 This step ensures your website looks professional, works smoothly, and is ready for visitors.
Check #1
Check All Pages
✔ Home page is properly designed
✔ About page explains who you are
✔ Contact page is working
👉 Make sure there are no empty or incomplete sections.
Check #2
Test All Links
✔ Menu links
✔ Buttons
✔ Internal links
👉 Ensure everything is working correctly.
Check #3
Check Mobile Responsiveness
Most visitors use mobile devices.
👉 In Elementor:
✔ Switch to mobile view
✔ Adjust spacing and text if needed
👉 Your website should look clean on all devices.
Check #4
Improve Website Speed
Fast websites rank better and keep users engaged.
👉 Make sure:
✔ Cache plugin is active
✔ Images are optimized
Check #5
Enable SSL (HTTPS)
Your website should show 🔒 in the browser.
👉 Hostinger usually provides free SSL.
✔ Builds trust
✔ Improves SEO
Check #6
Basic SEO Setup
Using Rank Math/ Yoast SEO:
✔ Add meta title
✔ Add meta description
✔ Use proper headings (H1, H2)
👉 This helps your site appear on Google.
🎉 Launch Your Website
Once everything looks good:
👉 Your website is officially LIVE 🌍
You can now:
✔ Share it with others
✔ Start publishing content
✔ Promote your services
👉 This helps your site appear on Google.
🚀 What To Do Next?
Frequently Asked Questions
1. Can I create a website without coding?
Yes, you can create a website without any coding skills.
👉 Using WordPress and tools like Elementor, you can design your website with simple drag-and-drop features.
2. How much does it cost to make a website?
For beginners, it usually costs around $30–$80 per year.
👉 This includes:
- Domain name
- Web hosting
You can start small and upgrade later.
3. How long does it take to create a website?
You can create a basic website in 30–60 minutes.
👉 With practice, you can build and customize it even faster.
4. Which platform is best for creating a website?
WordPress is the most popular and recommended platform.
👉 It is beginner-friendly, flexible, and used by millions of websites worldwide.
5. Do I need to buy hosting and a domain separately?
No, you can buy both together.
👉 Many hosting providers (like Hostinger) offer a free domain with hosting, which makes setup easier.
6. Can I create a website for free?
Yes, but free websites have limitations.
👉 You won’t get:
- A custom domain
- Full control
- Professional look
For serious websites, paid hosting is recommended.
7. Can I change my website design later?
Yes, you can change your theme or redesign your website anytime.
👉 WordPress gives you full flexibility.
8. How can I get traffic to my website?
You can get traffic through:
✔ SEO (Google search)
✔ Blogging
✔ Social media
✔ Promotions
👉 SEO is the best long-term strategy.
9. Can I earn money from my website?
Yes, you can earn through:
✔ Affiliate marketing
✔ Selling services
✔ Ads
✔ Digital products
👉 Many websites generate passive income this way.
10. Is WordPress safe and secure?
Yes, WordPress is secure if you follow best practices.
👉 Use:
- Trusted plugins
- Regular updates
- Secure hosting
- Introduction
- 5 Steps To Make A Website
- Step 1: Define Purpose & Goals
- Step 2: Choose A Domain Name
- Step 3: Get Hosting
- Step 4: WordPress Installation
- Step 5: WordPress Important Setup
- Step 6: Theme Installation & Setup
- Step 7: Website Page Creation
- Step 8: Blog Setup
- Final Checklist & Launch Your Website
- Faqs on WordPress Website

Thanks, great article.
You are most welcome!!
Hey! Pragati I have setup a blog with the help of your guide. But how I will secure my website completely.
Really interesting
You sure know what you’re talking about. Everyone is going to soon be visiting your site.
Awesome explanation, you have covered all deep details helpful post for beginners and individuals how to want to create a website.
I really found this website is so useful for me, Thanks a lot for this detailed information.
Thanks for the wonderful article
Great Information and Amazing article keep it up
A great piece of content. And I am really greatful for your help via email. Thanks a lot.
Thanks for your kind words!
Thank you for the excellent article
Great work!, your post are always helping the people. Keep up the good job.
Its really informative.